
article{max-width:1180px;margin:0 auto;padding:42px 24px 80px} #sa-tear-top-guide{ --bg:#07131b; --panel:#0d1c25;
Attached Tear-Top Vial Cap: How to Open It Correctly
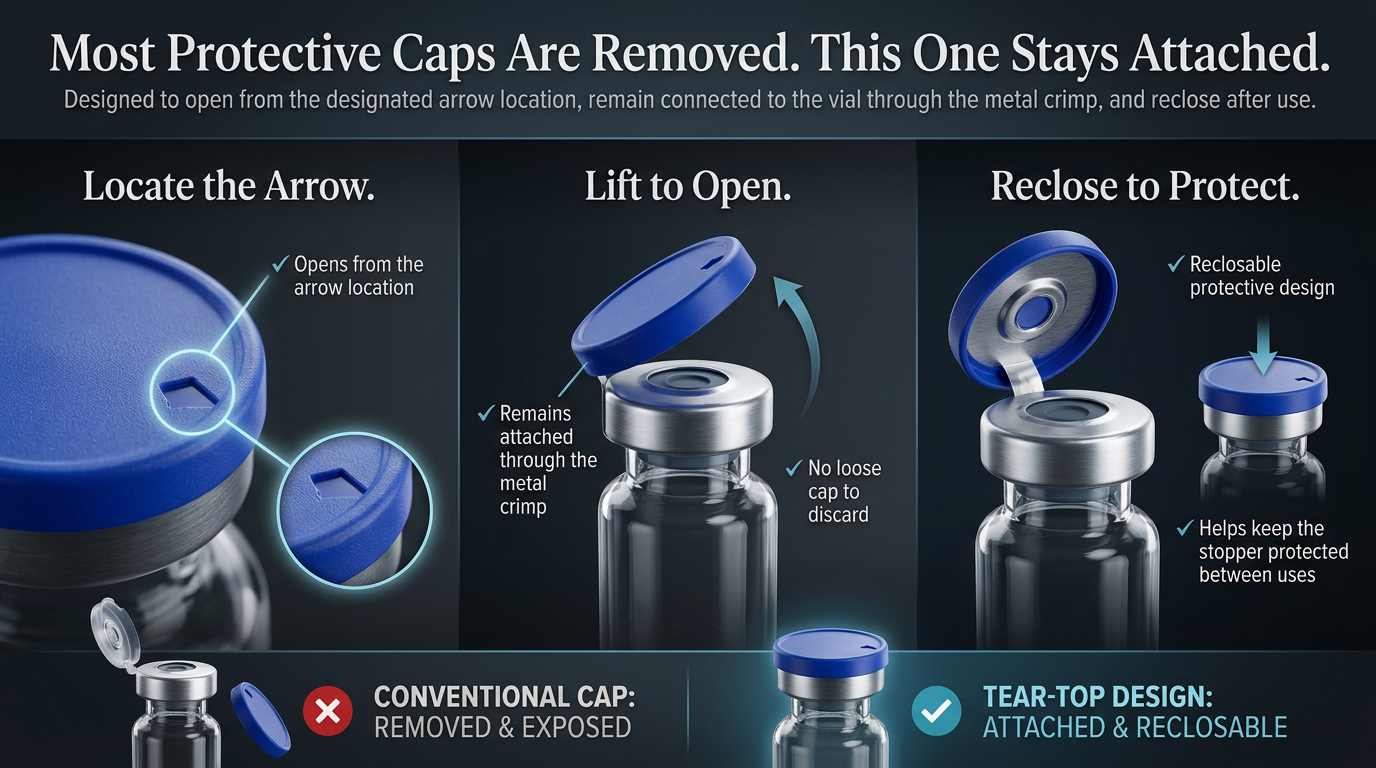
An attached tear-top vial cap opens at a marked location but stays connected to the metal seal. Unlike a conventional flip-off button, this design hinges open and can cover the stopper area again after handling.
What Is an Attached Tear-Top Vial Cap?
First, a stoppered vial usually includes a glass vial, an elastomeric stopper, an aluminum seal or ferrule, and a plastic protective cap. Packaging manufacturers describe aluminum seals and plastic buttons as secondary components that work with the vial-and-stopper system.
By contrast, lifting a conventional flip-off button breaks small connecting bridges and permanently removes the button. As a result, the center of the rubber stopper remains exposed, and the broken bridges prevent reattachment.
However, the attached design operates differently. It opens at a designated notch or arrow and remains connected to the metal crimp. Therefore, it reduces the chance of pulling away the aluminum ring and eliminates a loose plastic button that requires disposal.
How to Open an Attached Tear-Top Vial Cap
Locate the Arrow
First, inspect the top edge of the cap and find the molded arrow or opening notch. That mark identifies the intended lifting point.
Lift at the Marked Point
Next, place a fingertip beneath the edge at the arrow and lift upward with controlled pressure. Avoid pulling sideways on the aluminum ring.
Leave the Cap Attached
Finally, allow the cap to hinge open while the attached section remains connected to the crimp. After handling, press the cap down gently to cover the stopper area again.
Attached Tear-Top Versus Conventional Flip-Off Caps
| Feature | Attached Tear-Top Design | Conventional Flip-Off Design |
|---|---|---|
| Plastic cap after opening | Therefore, it remains connected to the metal crimp | By contrast, it separates from the vial and requires disposal |
| Opening point | For example, use the designated arrow or molded notch | Instead, the user lifts the plastic button from its edge |
| Reclosing | Afterward, it can cover the stopper area again | Therefore, removal normally prevents reattachment |
| Loose cap after opening | Moreover, no separate cap requires storage or disposal | Creates a separate removed button |
| Aluminum crimp | Meanwhile, it should remain secured around the vial neck | Should also remain secured around the vial neck |
| Sterility after opening | However, reclosing does not sterilize the stopper | Likewise, removing the cap does not sterilize the stopper |
Why the Aluminum Crimp Matters
The aluminum component serves a functional purpose. It holds the rubber stopper against the vial finish and supports the mechanical integrity of the container-closure system. Moreover, packaging guidance treats the vial, stopper, and aluminum seal as an integrated system whose dimensions and fit influence closure performance.
Therefore, removing the plastic top is not the same as removing the vial seal. The aluminum ring should remain firmly crimped around the vial neck. Set the vial aside when the ring lifts, rotates freely, becomes sharply deformed, or separates from the glass.
What the Reclosable Cap Does
✓ Covers the Stopper Area
For example, closing the cap helps shield the stopper surface from incidental contact, dust, and handling between access events.
✓ Remains With the Vial
In addition, the cap stays with the vial after opening, which can improve convenience and reduce waste.
✓ Reduces Improper Pulling
Moreover, the designated arrow gives the user a clear opening point and discourages prying beneath the aluminum crimp.
✓ Provides Visual Protection
Finally, a closed cap lowers the chance of accidental contact with the stopper during normal storage or handling.
What the Cap Does Not Do
! It Does Not Restore Sterility
However, pressing the plastic cap closed does not disinfect or sterilize the exposed rubber surface.
! It Does Not Replace the Stopper
Instead, the elastomeric stopper serves as the penetrable closure seated in the vial opening.
! It Does Not Repair Damage
Likewise, a reclosed cap cannot correct a loose crimp, displaced stopper, cracked vial, puncture damage, or other closure problem.
! It Does Not Prove Product Integrity
Therefore, packaging appearance alone does not verify identity, purity, content, sterility, storage history, or suitability for research.
Handling the Exposed Stopper
After opening the protective top, avoid touching the stopper with fingers, tools, countertops, packaging, or other non-clean surfaces. For example, CDC medication-vial guidance directs healthcare personnel to disinfect the rubber septum with alcohol, allow it to dry, and use aseptic technique for each vial entry.
Importantly, those clinical recommendations show why users should not mistake a protective cap for a sterile barrier after opening. Laboratory users should follow institutional procedures, manufacturer instructions, applicable regulations, and appropriate safety protocols.
- First, handle the vial with clean, dry hands or suitable laboratory gloves.
- Next, open the cap only at the designated arrow or notch.
- Also, avoid touching the rubber stopper with your fingers.
- Moreover, never pry underneath the metal ring.
- Likewise, avoid pliers, knives, or metal tools when opening the cap.
- Then, inspect the stopper, aluminum seal, and glass before use.
- Afterward, reclose the protective cap gently rather than forcing it.
- Finally, follow the manufacturer’s and laboratory’s handling instructions.
Common Opening Mistakes
! Pulling From the Wrong Side
For example, lifting from an unmarked location may place excessive stress on the hinge or metal seal.
! Twisting the Cap
Instead, the cap should lift rather than unscrew. Twisting can deform the plastic or transfer force to the aluminum crimp.
! Pulling the Metal Ring
Moreover, the aluminum ring forms part of the closure assembly, so users should not peel it away to access the stopper.
! Assuming It Is Defective
Because many people expect complete detachment, the attached design may initially appear stuck. However, the cap can still function as intended.
When Should Researchers Set a Vial Aside?
First, evaluate packaging damage before using the vial in research. Then, set the vial aside and contact the supplier when any of the following conditions appear:
- First, the glass shows cracks, chips, or leakage.
- Next, the rubber stopper appears displaced or partially removed.
- Also, the aluminum crimp appears detached, severely bent, or loose around the vial neck.
- In addition, the cap assembly arrived broken before opening.
- Moreover, the stopper shows a puncture or signs of tampering before use.
- Finally, the label, batch information, or product identity does not match available records.
In addition, retain the vial, cap, packaging, packing slip, and clear photographs until the supplier completes its review. Early disposal may prevent the supplier from determining whether manufacturing, shipping, or opening caused the damage.
Frequently Asked Questions
Is the cap supposed to come completely off?
No. Instead, the attached tear-top design shown here stays connected. Instead, the design hinges open while it remains connected to the aluminum crimp.
Why is there an arrow on the cap?
First, the arrow identifies the intended opening location. By contrast, lifting elsewhere can make the cap harder to open and may place unnecessary force on the seal.
Can researchers close the cap again?
Yes. Yes. Afterward, press the plastic cap back over the stopper area to reduce incidental contact. However, reclosing does not sterilize the stopper.
Does the attached cap keep the vial sterile?
The cap helps cover the stopper. However, users should not treat it as a sterile barrier after opening. Therefore, the rubber septum still requires appropriate handling under the applicable protocol.
Should the aluminum ring move?
Normally, it should remain securely crimped around the vial neck. However, a severely loose, lifted, or detached ring may indicate damage.
Can I use a tool to lift the cap?
Moreover, tools are generally unnecessary and can damage the cap, metal seal, stopper, or glass. Instead, open it by hand at the marked location.
Is this the same as a conventional flip-off cap?
No. By contrast, a conventional flip-off button normally separates permanently. Meanwhile, this design remains attached and can cover the stopper again.
Does a broken plastic hinge prove compromised contents?
Not automatically. First, remember that the plastic top serves as a secondary protective component. However, inspect the vial carefully and confirm that the aluminum crimp, stopper, and glass remain intact.
Why use an attached design?
For example, it can provide a clear opening point, eliminate a loose cap, and cover the stopper area again between handling events.
Research Summary
Published packaging information supports several distinctions. First, traditional flip-off seals use a plastic button connected to the aluminum seal. Removing that button breaks connecting bridges and exposes the stopper. Meanwhile, the aluminum seal and rubber stopper work together as part of the vial closure system. Manufacturers evaluate opening force, dimensional compatibility, machinability, and container-closure integrity because each factor influences performance.
By contrast, the attached tear-top style keeps the protective cap connected. However, that convenience does not sterilize the stopper or prove product quality. Therefore, proper opening technique, inspection, and handling remain important regardless of cap design.
Locate the Arrow. Lift Gently. Leave the Crimp Attached.
The attached tear-top vial cap should open at the marked point. Meanwhile, the aluminum ring should remain secured to the vial.
Do not twist, pry, or pull the entire closure assembly away.
Sources and Further Reading
- First, West Pharmaceutical Services discusses plastic cap removal, aluminum bridges, stopper exposure, and removal-force testing in “Flip-Off® Seal Cap Removal Testing.” View source
- Next, West Pharmaceutical Services reviews vial seal types, aluminum seals, plastic buttons, and closure mechanisms in “Seals: Secondary Components for Drug Product Packages.” View source
- In addition, West Pharmaceutical Services describes precision manufacture, machinability, container-closure integrity, and user convenience in its Flip-Off® Seals product information. View source
- Moreover, Datwyler Healthcare describes integrated vial systems that use elastomeric stoppers and aluminum flip-off closures in “Sealing Solutions for Vials.” View source
- Likewise, Datwyler Healthcare discusses dimensional compatibility among the vial, stopper, and seal in “Sealed with Science: The Art of Leak-Proof Pharma Packaging.” View source
- Finally, CDC guidance for outpatient oncology settings explains septum disinfection, drying, and aseptic technique. View source
- Also, CDC safe-injection guidance addresses vial-septum disinfection and use of new equipment for vial entry. View source